


Time to read: 6 min
As one of the most popular manufacturing techniques for mass production, plastic injection molding can be used with many different thermoplastics to make parts with complicated designs that would be nearly impossible to create with any other method. If you’d like to know how it works and how it measures up to 3D printing, keep on reading.
How it Works
Before we go into the ins and outs of the injection molding process, you’ll first need to know about the machine’s various components and what they do.
Components
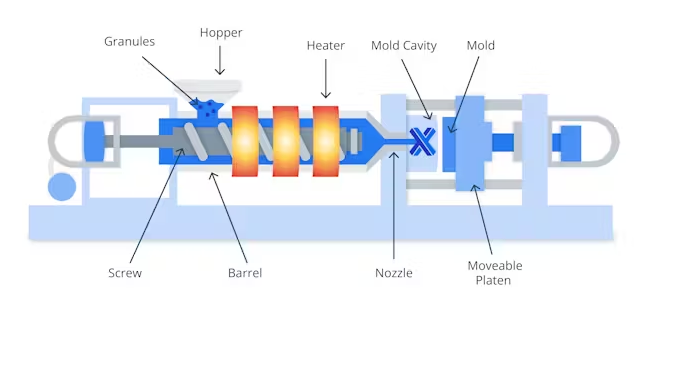
All the important parts of an injection molding machine are shown in the image below, with descriptions of each in the table further down.
| Part | Location | Job | Appearance |
|---|---|---|---|
Barrel | In the middle of the machine, houses reciprocating screw | Holds, melts, and mixes plastic pellets, ensuring uniformity and maintaining pressure during injection | Long cylindrical tube wrapped in heater bands, with a heated nozzle tip |
Gates | Between runners and mold cavity | Control the flow of molten plastic into the cavity | Small openings |
Heaters | Outside the barrel | Provide thermal energy to melt the pellets, control the temperature in the barrel | Metal bands around the barrel |
Hopper | Top of the machine, near the barrel | Feeds material into the barrel, sometimes includes a dryer to remove moisture that could damage parts | Funnel-shaped opening |
Mold | Attached to the stationary and movable platens | Shapes the molten plastic into the final part | Metal block, typically two halves (stationary and movable), includes the mold cavity, ejector pins, cooling channels, and vents |
Mold Cavity | Inside the mold | Creates the final shape of the molded part, has vents for good airflow, and lets air escape | Hollow space shaped like the desired part includes runners, sprues, gates, and vents |
Movable platen | Linked to the core of the mold | Moves to clamp the mold halves tightly and release the core when the part is done | Flat, rectangular metal plate |
Nozzle | At the end of the barrel, facing the mold | Directs molten plastic into the mold cavity, prevents it from cooling as it enters sprues and runners | Tapered, heated outlet |
Pellets | Inside the hopper and barrel | Raw plastic material for molding, commonly thermoplastics like ABS, PP, or nylon, and sometimes with dyes and/or other additives | Small, plastic granules of the same size |
Reciprocating screw | Inside the barrel | Mixes, compresses, and forces the pellets through the barrel as they melt, pulls back to allow more material in for the next cycle | Corkscrew-shaped rod |
Runners | Channels within the mold | Direct molten plastic from the sprue to the gates for even flow and minimal waste, often removed after molding | Long, narrow pathways |
Sprue | Central channel that connects the nozzle to the runners, the entry point of molten plastic | Guides molten plastic from the nozzle to the runner | Cone-shaped channel |
Injection Molding Machine Components
Process
Plastic injection molding uses thermoplastic pellets, which need to be melted first. These are fed into the hopper and make their way to the barrel, where the reciprocating screw pulls back to make room for them to get through. The screw then goes forward again to force the plastic through the nozzle. The pressure from the platen makes sure that no plastic can get away by bringing the nozzle and mold closely together tightly. Here, the melted plastic is pressurized, something that makes it go into all the mold cavity’s parts, taking up the space that the air previously occupied. As the plastic fills every single crevice (including the sprues and their buddies, runners, and gates), the air that was in that empty space now comes out of the mold vents.
The mold has to stay steadily at a temperature that aligns with the specific material’s melting point so that the part inside can cool and harden evenly. In addition, the holding pressure also has to be constant so that there’s no backflow of material into the barrel. This also keeps the shrinking under control. More pellets are then put in the hopper so there’s no downtime—once the part is cooled and taken out, it’ll be ready to go again. The platen opens when it’s time to eject your creation, and the screw does its job again—allowing room for material before pushing it through… it basically works like this on a loop.
Getting Started
Before you see all your wonderful products being made, you need to take care of two important things: your mold design and the actual mold.
Design
First things first, your product needs to be designed. This is typically done as a CAD file or other transferable format, and you’ll follow the necessary design guidelines for the particular injection molding process you’re using. For the best chance of success with injection molding your plastic parts, try to include features like bosses for threaded inserts or fasteners, hollow cavities for thicker sections, rounded edges, ribbed supports for extra strength, snap-fit joints, or friction fits as joining features, living hinges where you need some flexibility, and draft angles on vertical walls. You’ll also want to make sure that wall thicknesses are consistent (or as much as possible) and avoid features that can lead to defects. These include overly thin/thick walls, sudden changes to the shape, i.e., sharp corners, randomly placed holes, badly designed ribbing, and undercuts or overhangs.
Tooling mold
The tooling mold is undoubtedly the star of the show in the whole injection molding process. Making this, however, is no walk in the park—it’s the longest and most expensive part of the whole process and needs to be done by professional machinists who know exactly what they are doing. Based on your design, these experts craft the “tool” (that’s what those in the know call a tooling mold), then make their own blueprint that has all the necessities (cavity, sprues, gates, ejector systems, etc.). If you think that you’ll get your mold on next-day delivery, think again; the process of making the mold (including approvals) can take 20 weeks… sometimes more! So imagine how long you’ll have to wait (and how much it’ll cost) if you need to make changes to the mold… Suffice it to say, it’s important to get the design right before handing it over.
Compatible Materials
The materials listed in the below table are all suitable for plastic injection molding.
| Material | Resistant to | Not Resistant to | Characteristics/Applications |
|---|---|---|---|
Polypropylene (PP) | Chemicals, moisture, fatigue, moderate impact, moderate heat (100–120°C) | UV light, high heat | Moderate strength, lightweight, flexible; containers, automotive parts, textiles |
High-density polyethylene (HDPE) | Chemicals, moisture, weather, high impact, moderate heat (70–120°C) | UV light, high heat | Tough, fairly hard, durable; pipes, bottles, and toys |
Polystyrene (PS) | Stiffness, machinability | Impact, chemicals, low heat (<100°C) | Brittle, clear or opaque, easy to mold; packaging, disposable cups, and insulation |
Polyethylene (PE) | Chemicals, moisture, high impact, low to moderate heat (70–120°C) | UV light, high heat | Tough, flexible; bags, containers, and insulation |
High-impact polystyrene (HIPS) | Moderate impact, machinability, low to moderate heat (<100°C) | UV light, high heat, solvents | Moderately strong, tough, versatile; signs, toys, and casings |
Polyvinyl chloride (PVC) | Chemicals, flame, moderate impact, moderate heat (60–82°C) | High heat, solvents | Fairly tough, rigid, durable; pipes, flooring, and cables |
Acrylic (PMMA) | UV light, weathering, scratches | Impact, chemicals, low to moderate heat (~100°C) | Fair strength, brittle, transparent; lenses, windows, and displays |
Acrylonitrile butadiene styrene (ABS) | Impact, chemicals, moderate heat (100–110°C) | UV light, solvents | Tough, machinable; car parts, toys, and casings |
Polycarbonate (PC) | High impact, UV light, high heat (~135°C) | Abrasion, solvents | High toughness, hard, transparent; eyewear, electronics, and automotive parts |
Nylon (PA) | Wear, fatigue, moderate impact, moderate to high heat (120°C) | Moisture, acids | High strength, tough, low friction; gears, bearings, and textiles |
Polyurethane (TPU) | Abrasion, fatigue, moderate impact | Heat (>80°C), chemicals | Very flexible; seals, wheels, and footwear |
Polyetherimide (PEI) | Heat (170–200°C), chemicals, low to moderate impact | Impact | Strong, rigid; aerospace components, medical devices |
Polyether ether ketone (PEEK) | Heat (260°C), chemicals, low to moderate impact | UV light | High strength, rigid; aerospace parts, medical implants |
Polyphenylene sulfide (PPS) | Chemicals, heat (280°C), low to moderate impact | Impact | Moderate strength, hard, dimensionally stable; electrical components |
Injection Molding Compatible Materials